Showing posts with label book. Show all posts
Crafty Book Binding
 The materials used for this little book. Everyone seems to have left-over bits of paper, so rather than toss out, make a book!
 Tools used for this project. A paper punch (to create circles), needle, awl, bone folder, bulldog clips, exacto blade, scissors, and a ruler.
 Cut and fold paper and cardboard to the size you want the book to be. Burnish the folds with a bone folder.
 After scoring the back side of both the front and back covers (about 3/4" from side), clip all pages and covers with bulldog clips. Use some paper to pad the bulldog clips to prevent dents in cardboard.
 For a 5"x7" book punch three holes with the awl: one in the centre and one on each end about 1" in.
 Using book binding thread or a sturdy cord or ribbon, start stitching. I used a stitch very similar to what I did with wedding albums. It's pretty easy, but you really can come up with many different patterns. Try it out!
Cut out shapes with your scrap paper. We made some simple birds and circles. Glue stick was used to attach cut-outs to cover.
 My niece wanted a place for "secret messages and stickers", so I made an envelope for the inside back cover. Every girl should have a safe place for secret messages and stickers!
 You can do so much with a few bits of scrap paper and some book binding tools. Have fun!
Original Post: http://www.poppytalk.com
Mini Book Necklace Tutorial
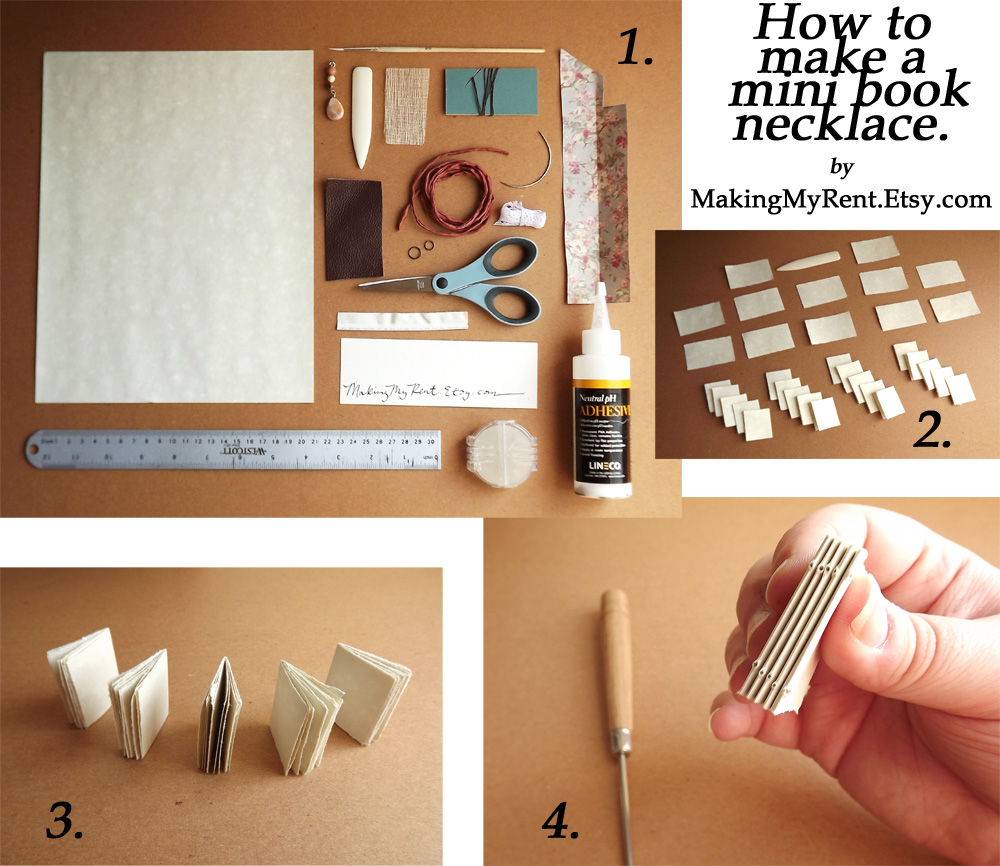
1. To make this mini book necklace gather these supplies: one sheet of paper (I used Wausau stationery), a small paint brush, scissors, super/scrim, PVA glue, linen thread, bees wax, silk head bands, leather, decorative paper, a sewing needle, an awl, two jump rings, a silk cord, a charm, and a short bit of lace.
2. Fold and tear into 16 (5mm tall x 3 1/4mm wide) rectangles, then fold those in half again.
3. Place five of the folios inside each other to form five sections.
4. Punch two holes in each section with an awl.

5. Wax your linen thread. (Or buy pre-waxed linen.)
6. Insert the needle into the first hole and out the other.
7. Then put it through the corresponding hole in the second section and through the other hole.
8. Tie the two ends of thread together and insert the needle through the first hole in the third section.
9. Insert the needle between the thread spanning the first and second section. This is called the kettle stitch.
10. Complete the fourth and fifth section in the same way. Finally, tie a knot to finish.
11. Snip off the excess thread ends.
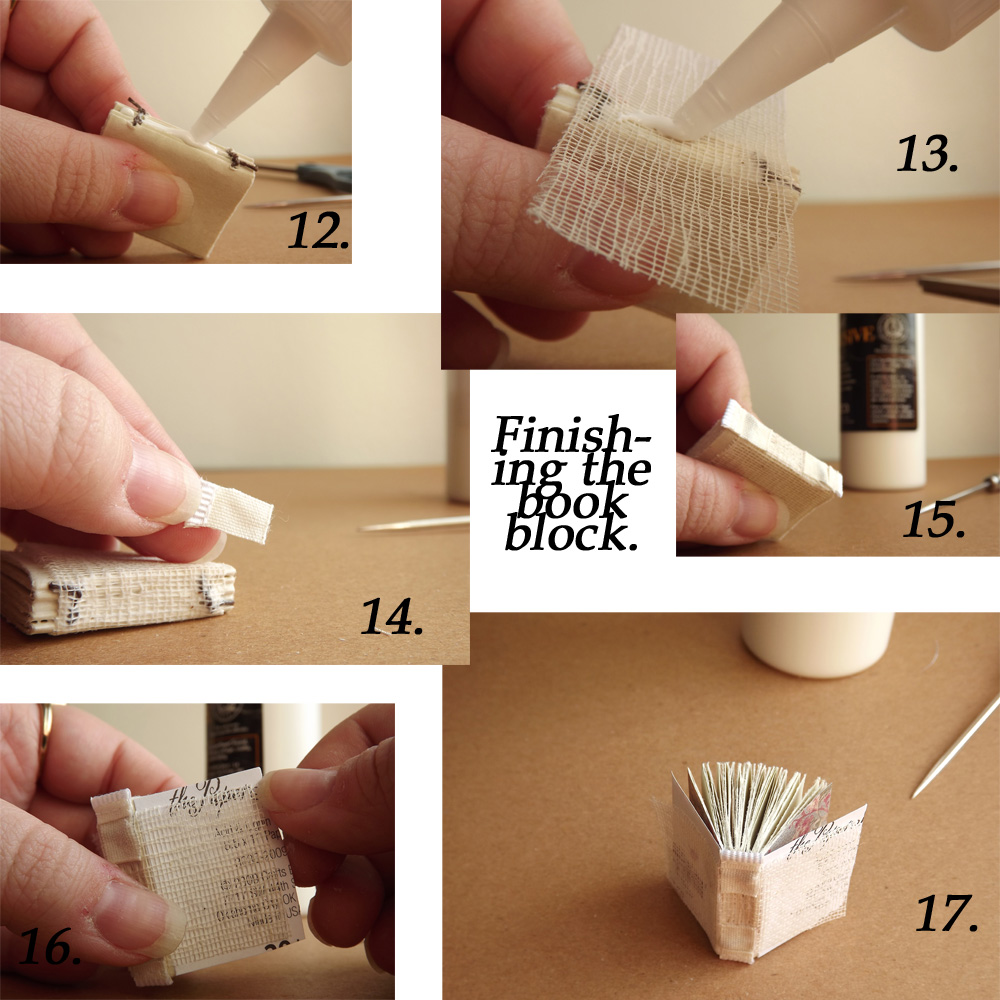
12. Glue up the spine with the PVA glue. Press under a larger book until dry.
13. Attach the super/scrim to the spine with glue. Press with your fingers or brush to make sure it's secure.
14. After letting it dry, cut silk headbands to the appropriate size and glue to the spine.
15. The finished spine will look like this. For extra security, add paper to cover the spine.
16. Glue the endpages with a narrow line of glue next to the crease. Trim if they're too large.
17. Your finished book block will look like this.
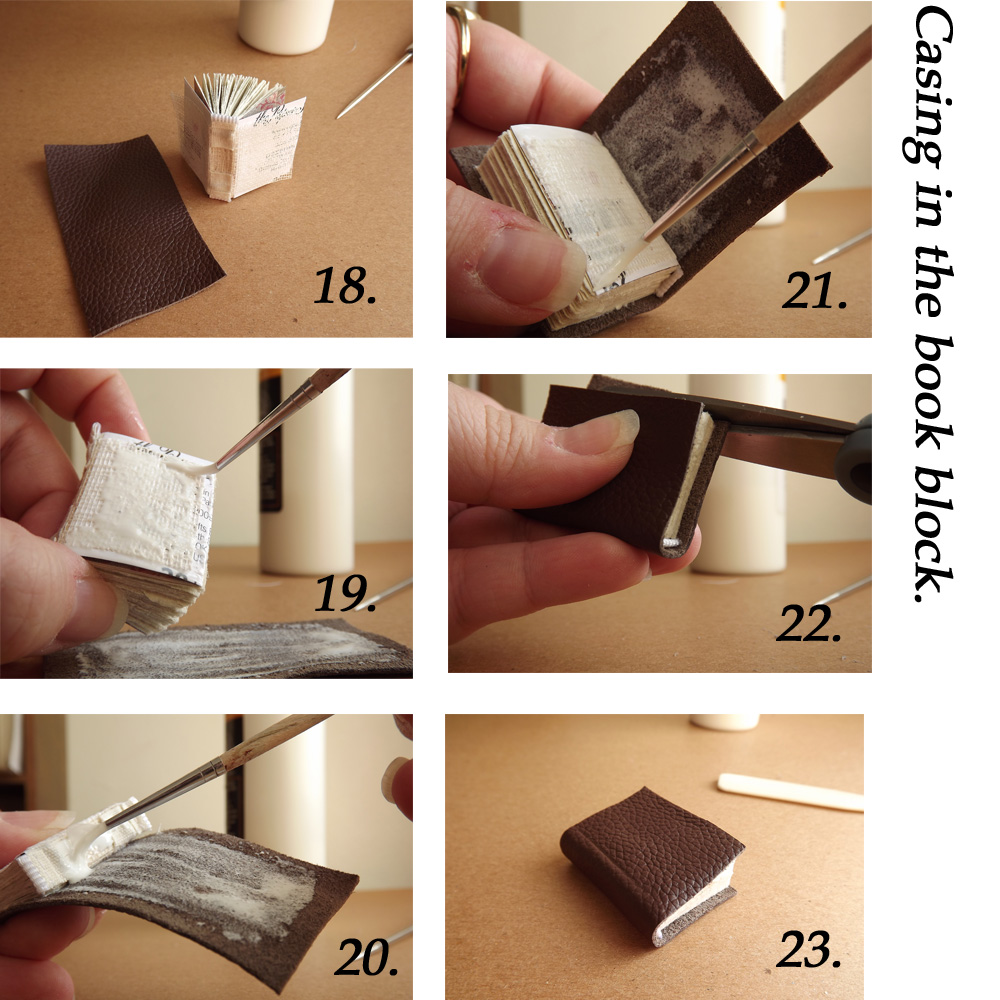
18. Cut the leather to near the size you need.
19. Spread the glue on both the leather and endpage, making sure that the the holes in the super are filled.
20. Attach the book block to the leather and glue up the spine.
21. After pressing the leather to the spine, glue the other endpage to the leather.
22. Trim excess edges.
23. Allow to dry beneath your book press. Afterward, you'll make it into a charm.

24. Open to a page near the center and punch a hole near the top where you'll place a jump ring.
25. Guide the ring through the hole and close.
26. If you'd like a lace or leather tie, use an exacto knife to cut a line in the front cover. Then, put the tie through and tie.
27. Your book charm is done! Hang it on your cord, and voilà!
 |
| This book necklace if for sale in my shop here. |
Original Post: http://makingmyrent.blogspot.com
The Secret Belgian Binding
These instructions show you how to bind a book with an interesting pattern of weaving which laces the front and back covers to the spine. Included is the sewing of the text block (a set of four signatures) which is attached to the inside spine of the cover.
The secret is in the weave of the cover and in attaching the text block. It is not difficult to do but requires patience in getting the threads taut so that the book does not wobble.

Hedi Kyle rediscovered this binding attributed to the Belgians and she solved the mystery of how to make it.
The materials and tools needed are as follows:
Secret Belgian Binding InstructionsCut two covers out of mat board 4x5-3/4", and one piece 5/8x5-3/4", for the spine. Cover and line each piece with solid or decorative paper.
Cut 2 thirty-inch lengths of thread for weaving together the covers and spine. The second length will be attached with a square knot on the inside of the spine when needed.
 Fig. 1 represents the outside of the cover. With an awl punch holes that are 5/8" apart and 5/8" from the spine edge.
 To hold the spine and covers in place while weaving, place masking tape at the top and bottom as shown below.
There should be 1/16" space between the spine and covers.
It is best to test the masking tape to be sure it can be removed without pulling the paper with it. Always remove it carefully to prevent it from tearing the paper. After weaving a few rows, the top masking tape may be removed.
Thread the thirty-inch length of the thread onto a needle. With the cover design facing, start on the other side of the front cover (Fig.2) and bring the thread through the top hole. Leave 2" of the thread and secure it with masking tape. It will later be tied into a knot.

Weave the thread over the front cover and under the spine, then over the back cover into the top hole. Turn over and check that the thread is pulled taut but leave the 1/16"space between the covers and the spine. Weave the thread back under the back cover, (Fig. 3) over the spine and into the back of the hole of the front cover. Keep turning the cover to make sure the thread is not loose.

Weave back (Fig. 4) under the spine and into the top hole of the back cover.

Knot the thread at the end of the cover on the other side, as shown above.

Bring the threaded needle down the back to the second hole in the back cover. (Fig. 5)

Continue weaving as in Fig. 2, 3, and 4. Knot the end.
The Textblock

Insert the needle into the first hole of the first the signature. Leave a 2" tail:

Open the signature. Use a clothes clip to hold the signature in place while sewing:

Lay the signature on the left side and weave in and out catching the lacing on the inner spine as it is sewn across the signature:

At the end of the first signature insert the needle into the second signature as shown below. Weave in and out of the holes catching the lacing in the spine as before. At the end of the second signature tie the thread to the 2" tail with a square knot. Continue sewing into the third signature in the same manner. At the end of the third signature the thread must be fastened to the second signature or there will be a gap. Do this by making a kettle stitch into the second signature before entering the fourth signature. At the end of the fourth signature do the same. Be sure all threads sewn from the text block to the spine are taut before securing the last stitch with a kettle stitch knot.


Original Post: http://www.ruthbleakley.com


